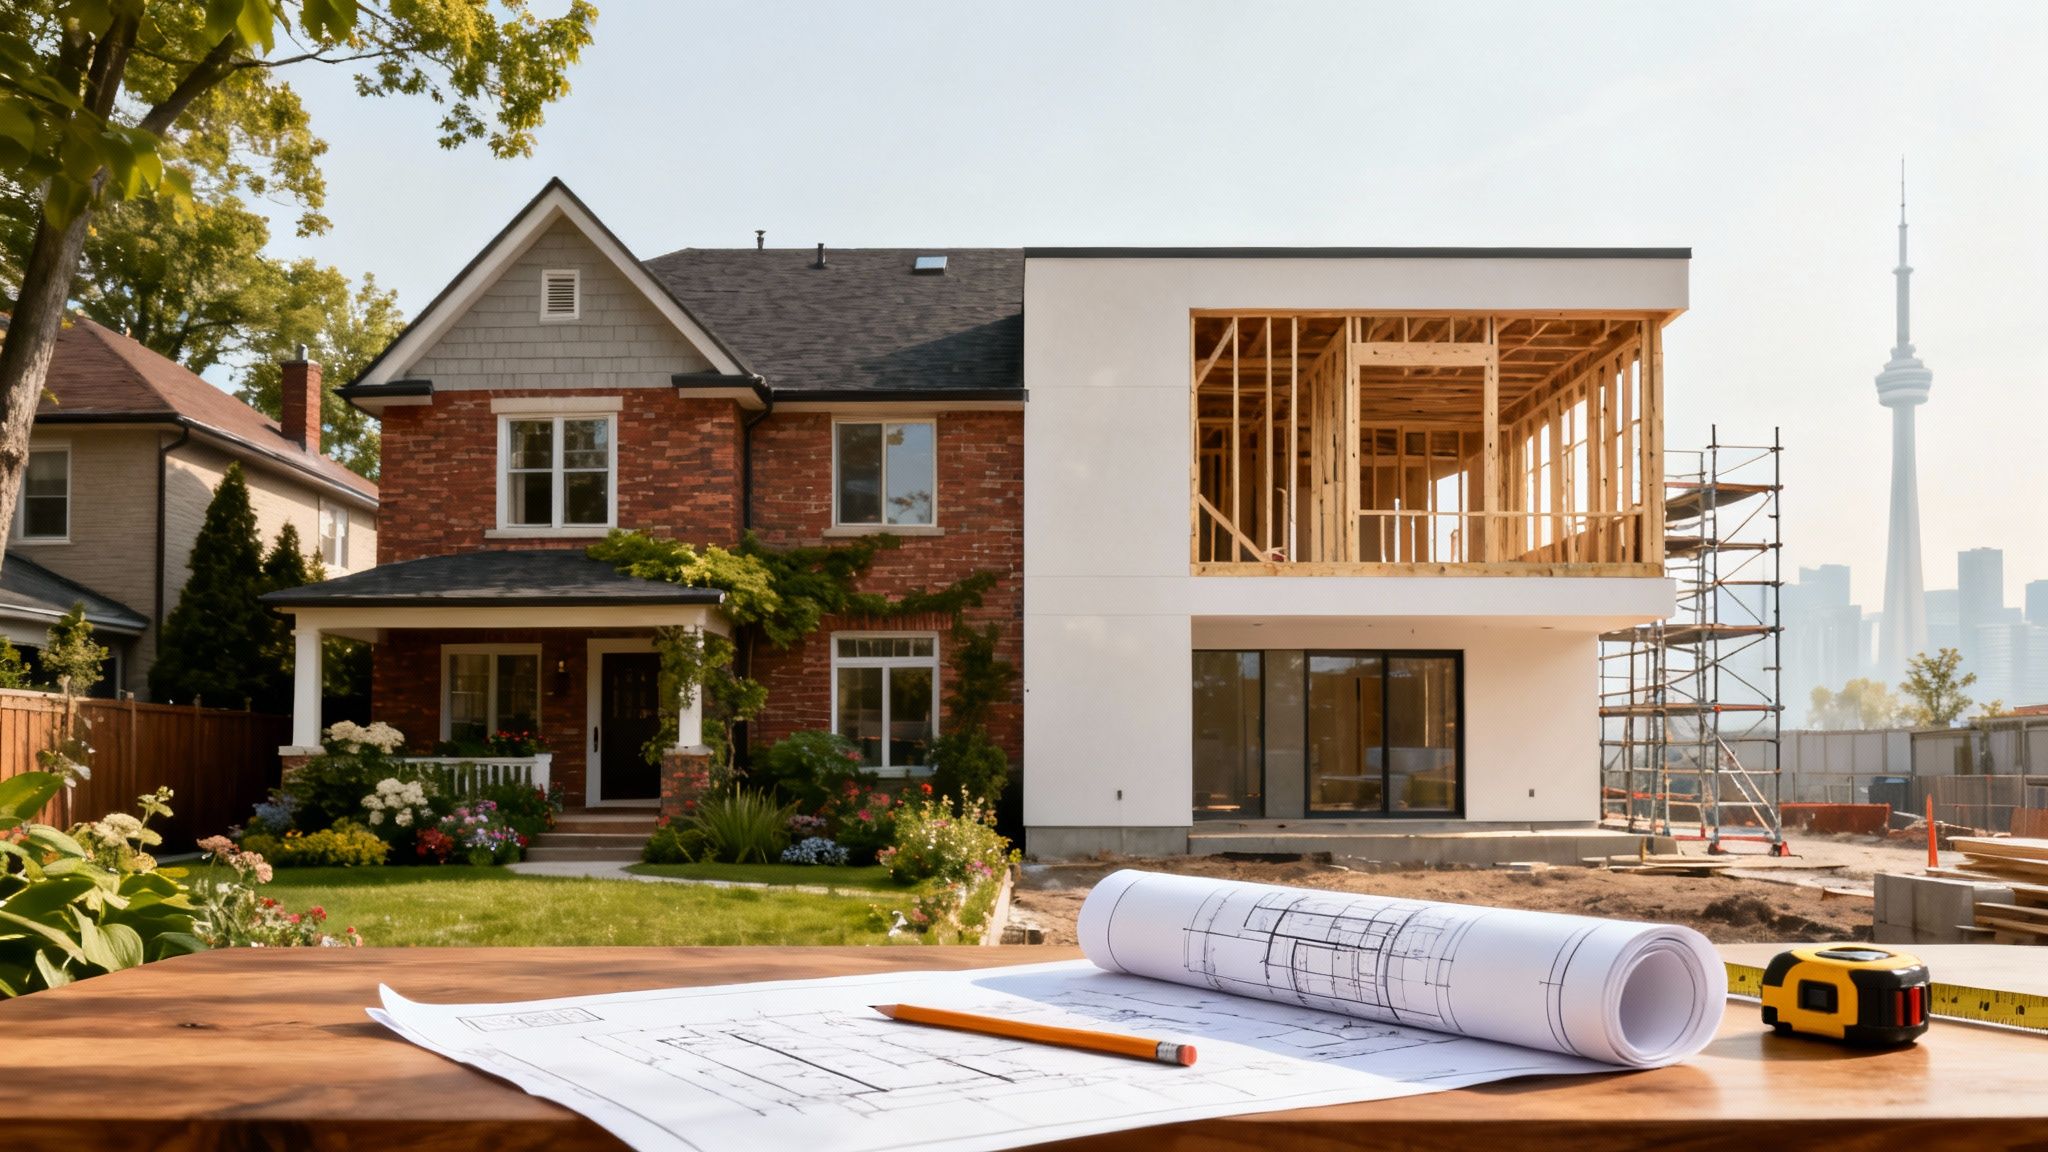
If you’re a Toronto homeowner, home additions and renovations let you unlock extra living space and breathe new life into your interiors—no packing boxes or moving truck required. By combining fresh square footage with contemporary updates, you’ll streamline daily living and boost your property’s market value.
Understanding Home Additions And Renovations
Imagine your house as a garden that changes with each season of your life. An addition is like planting a new flower bed—adding space for your family to flourish. A renovation is more like pruning mature blooms—keeping everything vibrant and healthy.
In Toronto, zoning by-laws and heritage designations set the stage for what you can build or modify. Familiarizing yourself with permit requirements early on helps prevent delays and unexpected fees. Always factor in municipal reviews and heritage approvals before anyone picks up a hammer.
Key Elements At A Glance
- Design-Build Synergy aligns architects and builders under one agreement
- Budgeting Principles blend realistic estimates with contingency buffers
- Permits make sure your project meets City of Toronto and heritage standards
- Phased Timeline maps out each step, from initial concept to final walkthrough
Roles In The Design-Build Team
With a design-build approach, a single team handles everything—from the first sketch through construction. That unified structure cuts down hand-offs, clarifies budgets and can even speed up municipal approvals by presenting one cohesive plan.
Budgeting in this model feels a bit like layering soil: start with hard costs (materials and labour), then sprinkle on a 10–15% contingency mulch. That extra buffer covers hidden repairs or tricky site conditions, keeping your budget intact.
Permit Basics For Toronto Projects
Securing permits in Toronto can resemble navigating a winding maze. You’ll need zoning clearance, building permits and several inspections. Heritage properties add an extra layer—heritage permits and conservation officer reviews.
Engaging municipal planners early helps trim review headaches. Submit clear drawings, schedule a pre-consultation and prepare to answer questions. A thorough application can shave weeks off permit wait times.
“A clear permit application is like having a GPS in an unfamiliar city—it keeps you on track and avoids wrong turns.”
Roadmap From Vision To Walkthrough
Every renovation follows six familiar steps: vision, design, permits, budget, construction and finishes. Laying out each phase keeps everyone aligned and the project moving.
- Concept Clarification – Sketch ideas and prioritise needs
- Detailed Design – Collaborate with your design-build team on construction drawings
- Permit Submission – File applications and refine plans based on feedback
- Budget Finalization – Lock in numbers and fine-tune your contingency
- Construction Phase – Monitor progress with regular inspections
- Finishing Touches – Install fixtures and complete the final walkthrough
Budgeting And Contingency Principles
Start your cost estimate by gathering quotes from local suppliers familiar with Toronto pricing. Labour rates reflect union standards and seasonal demand. Your contingency mulch acts as a safety net—covering surprises like hidden joist damage or unexpected site conditions.
Think of your budget in layers:
- Base layer for must-have items
- Topsoil layer for upgrades
- Mulch layer for surprises
That way, your renovation can grow without starving essential elements.
Toronto Zoning And Heritage Considerations
Toronto’s neighbourhoods range from sleek new developments to protected heritage zones. Older properties often come with design guidelines and review panels. Expect permit surcharges and possibly heritage-consultant fees.
Booking a pre-application meeting with the city helps clarify special requirements. It’s a small step that can prevent costly design revisions later. In historical districts, preserving original materials and façade details is typically non-negotiable.
Crafting Your Vision Statement
Think of your vision statement as your garden sketch before you break ground. It outlines style, square footage needs and functional goals. Share it with your architects to ensure everyone moves in the same direction from Day One.
Concrete examples—like adding a sunroom or reconfiguring your kitchen—make your vision more tangible. Mood boards, quick sketches or even Pinterest collections help refine priorities and guide budget and schedule decisions.
“Starting with a clear vision saves both time and money down the line,” says a Toronto design-builder.
Use this guide to navigate your renovation journey with confidence and clarity.
Types Of Home Additions And Renovations
Toronto homeowners enjoy a wide range of options for expanding or refreshing their living spaces. From modest updates to full-scale builds, each choice has its own set of trade-offs and benefits.
In this section, we’ll explore popular project types, explain what each involves and help you choose the best fit for your lifestyle.
The diagram below shows a typical layout for an attic and foundation extension.
It highlights where support beams and mechanical runs adjust to carry new loads.
Popular Project Types
Many Toronto renovators start with targeted room upgrades before tackling larger additions. These smaller projects keep disruption to a minimum and still deliver a noticeable difference.
- Kitchen Refresh opens up cooking zones—often by adding an island or removing a non-structural wall—to let in more natural light and improve traffic flow.
- Bathroom Update brings in modern fixtures, walk-in showers, built-in storage and soothing neutral finishes.
- Second Storey Addition adds bedrooms or a home office above, complete with new structural beams and a solid permit strategy.
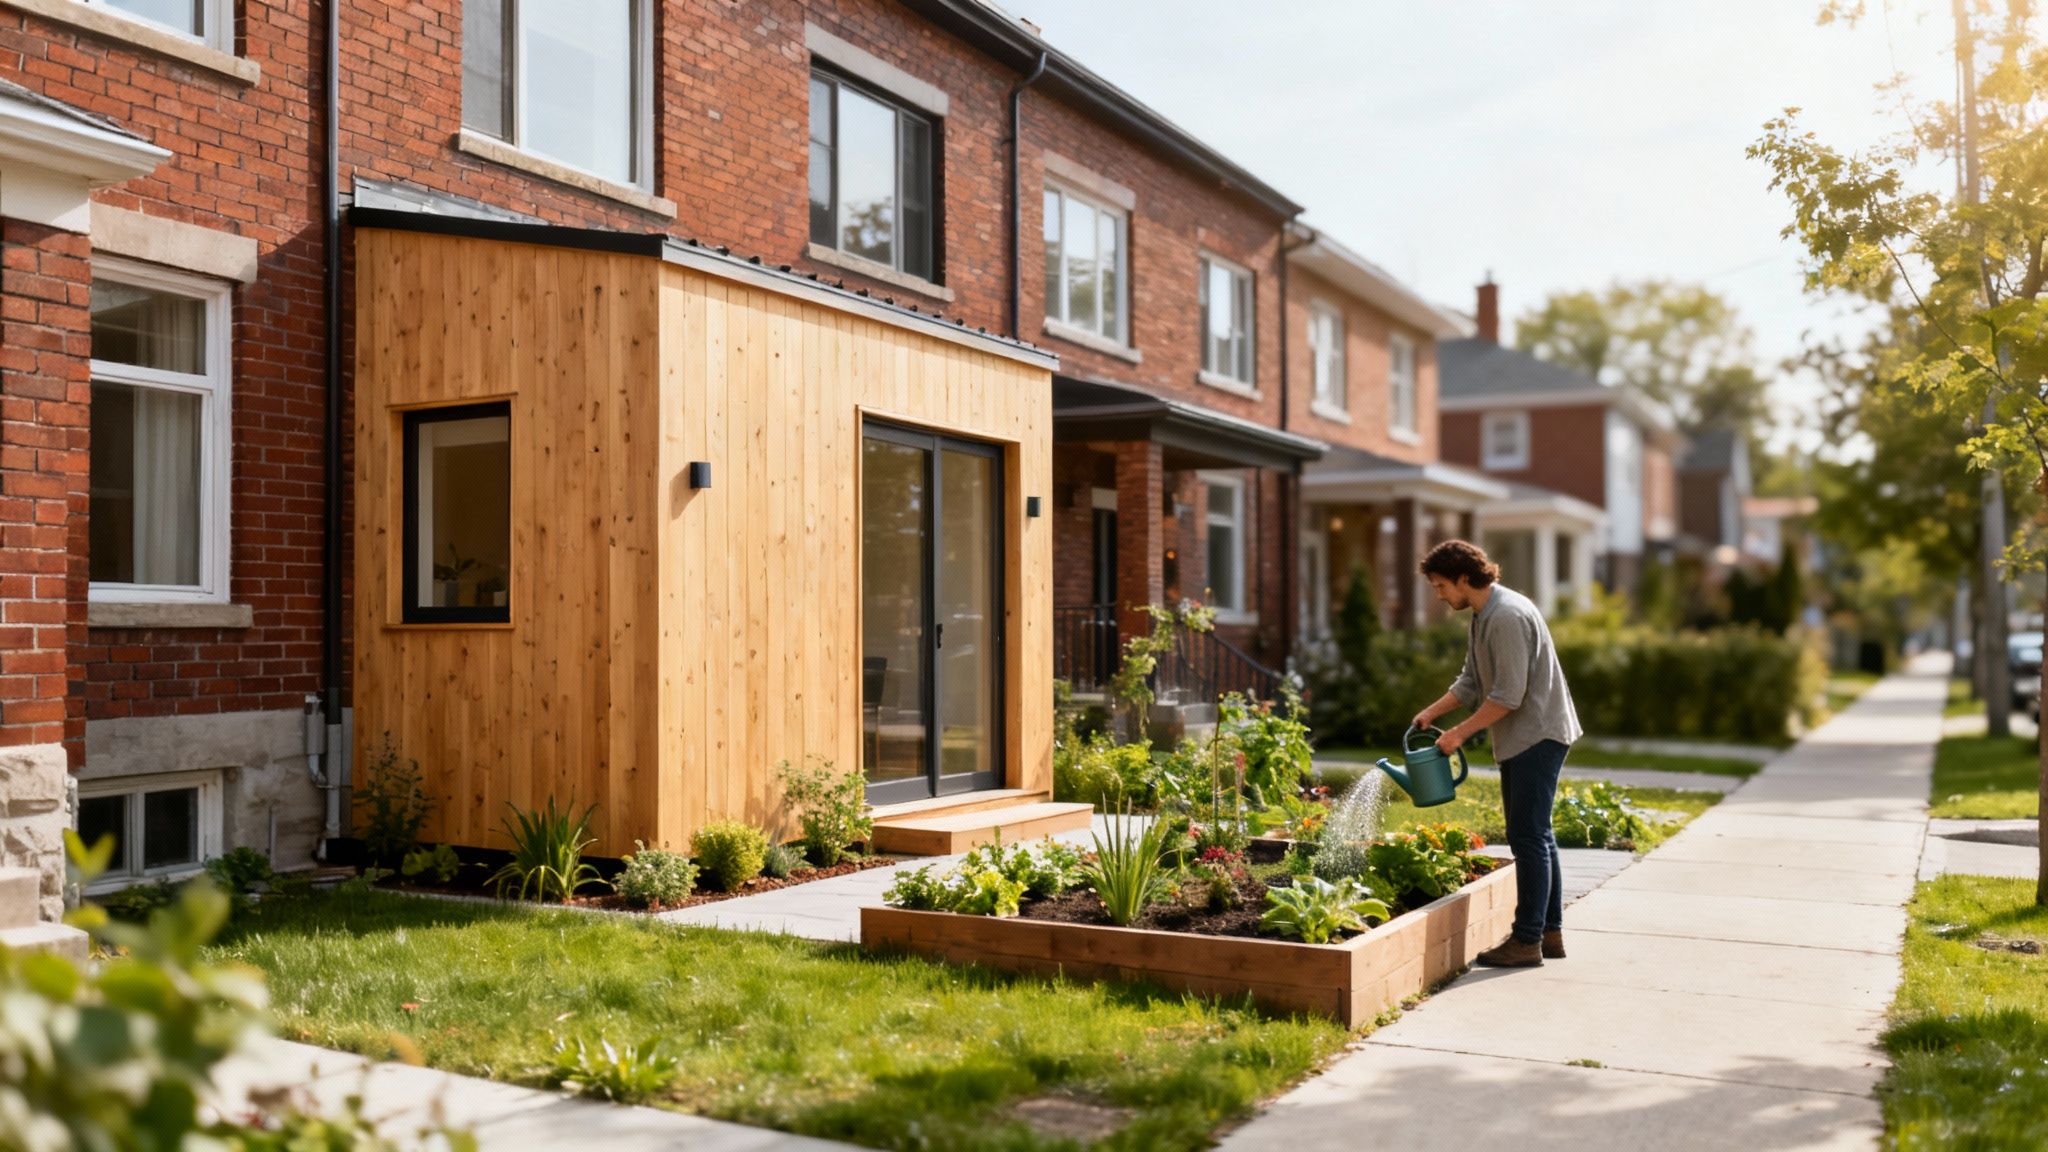
- ADU Conversion transforms a garage or laneway space into a self-contained suite, perfect for rental income or multigenerational living.
- Whole Home Makeover rethinks layouts and systems across your entire house, usually in phases so you can stay in place as work progresses.
A simple kitchen refresh often runs $30,000 to $50,000 CAD and pays for itself by enhancing flow and daylight.
Comparison Of Addition And Renovation Types
Below is a quick overview of costs and best use cases for Toronto homeowners:
| Project Type | Typical Cost Range | Primary Benefit | Best Use Case |
|---|---|---|---|
| Kitchen Refresh | $30k–$50k CAD | Brighter, more open layout | Small to mid homes |
| Bathroom Update | $25k–$40k CAD | Enhanced functionality | Busy families |
| Second Storey Addition | $150k–$350k CAD | Extra bedrooms or offices | Growing families |
| ADU Conversion | $120k–$250k CAD | Steady rental income | Tight lots |
| Whole Home Makeover | $200k+ CAD | Fully unified remodel | Outdated properties |
Use this snapshot to align your budget with your household’s needs.
Real World Examples
Here are three Toronto projects that illustrate these options in action:
- A basement conversion turns an underused cellar into an 800 sq ft family retreat or rental suite.
- A garage transformation finishes an existing shell—adding insulation, drywall and durable flooring—to carve out extra living space.
- A laneway suite rises behind the main house, creating a private studio ideal for income and privacy.
Key Insight Natural light paths and load-bearing walls often determine the design and feasibility of each project.
Deciding between these usually comes down to whether you need rental income or more bedrooms. To dive deeper, see our Additions Service.
Matching Projects To Lifestyle
Begin by thinking about daily routines, family growth and long-term goals. A bedroom addition might suit a growing brood, while an ADU can offset mortgage payments.
- Check local setback rules and heritage overlays early on.
- Inspect the existing structure to identify load-bearing walls and foundation capacity.
- Maximise daylight with well-placed windows to cut down on artificial lighting.
- Budget a 10–15% contingency for hidden issues.
These steps help your renovation stay aligned with both your living habits and your financing plan.
Key Takeaways
Planning a home addition or renovation means balancing cost, function and lifestyle goals.
The right strategy can boost both your living space and everyday enjoyment. Keep this guide handy when comparing kitchen tweaks, ADUs or complete makeovers.
Quick Checklist
- Define the new square footage and its purpose.
- Refer to the comparison table to check estimated costs and benefits.
- Schedule a design consultation early to confirm feasibility and budget.
- Plan temporary living arrangements to minimise disruption.
- Track spending and construction milestones as work proceeds.
Navigating The Design Build Process
The design-build approach brings architects, engineers and builders together under one roof. Think of it like coordinating a block party: every vendor reports to a single organiser, so there’s less confusion.
In Toronto, combining design and construction under one contract cuts down on miscommunications and costly delays. The process moves through six clear stages, each with specific deliverables.
- Initial Consultation where we sketch out your big ideas
- Detailed Design and Engineering to finalise plans and specs
- Permit Applications and Approvals with the City of Toronto
- Contractor Selection through competitive bids and evaluations
- Construction Management to oversee schedule, quality and costs
- Inspections and Final Walkthrough to confirm everything meets code
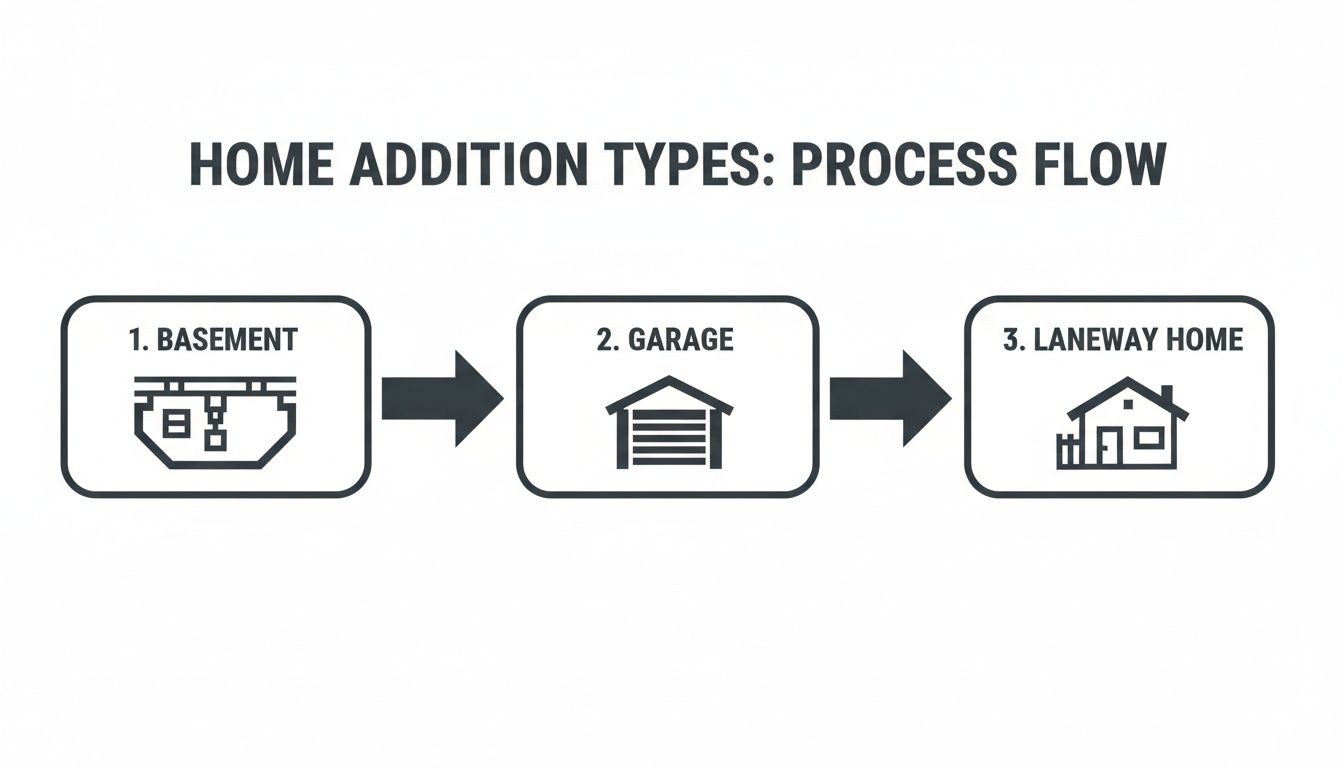
This chart shows basement conversions leading the pack, followed by garage projects and laneway suites across Toronto neighbourhoods.
Initial Consultation
We begin with a face-to-face meeting to turn your vision into rough floorplans. These sketches set boundaries for scope and give us a ballpark budget.
Early clarity prevents scope creep and hidden costs.
Permit Applications And Approvals
Getting drawings signed off by the City usually takes 4–8 weeks, depending on project complexity. A pre-application meeting with a planner can significantly reduce review cycles.
- Submit structural and MEP drawings
- Include a site survey and zoning compliance details
- Account for permit fees and heritage approvals where needed
Contractor Selection And Contracts
Having one point of contact simplifies scheduling—trades align under a single timeline. We compare bids on price, timeline and proven track records.
Check out our detailed guide on what a general contractor does for more insights.
Case Study: Leslieville Laneway Suite
- Three competitive bids kicked things off
- The selected contractor matched our budget and schedule
- Weekly updates kept neighbours informed and noise complaints low
Construction Management And Final Walkthrough
Managing construction feels a lot like festival logistics, with daily checklists for each crew. On-site inspections ensure specs are met and deadlines stay on track.
- Phase inspections clear structural, electrical and plumbing milestones
- File building permits and secure occupancy certificates
- A final walkthrough checks every punch-list item for compliance
At handover, we guide you through system operations and maintenance best practices. In Cabbagetown, one second-storey addition even finished with a neighbourhood gathering.
Streamlined collaboration often saves 10% on project costs and cuts weeks off the schedule.
Best Practices And Tips
Treat your renovation like a well-orchestrated event by using a festival-style timeline. Regular check-ins prevent surprises and keep momentum high.
- Use digital platforms for scheduling and document sharing
- Photograph progress at each milestone to catch issues early
- Build weather-related buffers into your schedule
- Confirm changes in writing with all stakeholders
With clear deliverables, solid contracts and frequent updates, your Toronto addition will run like a sold-out show. Embrace each milestone as a highlight, and you’ll go from concept to completion with confidence.
Typical Costs And Timelines In Toronto
Renovating or adding on in Toronto is part budgeting exercise, part patience test. Expect $60–$120 per hour for skilled trades, with union crews at the higher end.
Materials can swing your budget too—switch from entry-level tile to engineered hardwood and watch costs rise by 20–30%.
Permits range from around $1,000 for small jobs to over $10,000 for major additions. Heritage districts often tack on extra consultant reports and committee fees.
Seasonal Timeline Triggers
Picture your project like a garden: growth in spring, slowdown in winter. Cold snaps freeze foundation work, while hot summer days let crews race ahead.
City Hall slows down around the holidays, so December and January reviews can stretch out. Permit offices really pick up from April through June—just when trade calendars fill.
- Winter: frost delays excavation and concrete pours
- Spring: quick permit approvals but crowded trade schedules
- Fall: ideal weather, though shorter daylight can stretch finishing tasks
Permit Fees And Heritage Approvals
Toronto’s building, electrical and plumbing permit rules live online at the City of Toronto site.
Most projects clear reviews in 4–8 weeks, but heritage overlays add 4–6 weeks for conservation reports and committee sign-offs.
Cost Breakdown By Project
Here’s a quick look at local price tags and permit windows before you dive in.
Toronto Cost Ranges And Permit Timelines
| Project | Cost Range (CAD) | Permit Review Time |
|---|---|---|
| Kitchen Remodel | $40k–$80k | 4–6 weeks |
| Bathroom Remodel | $20k–$35k | 3–5 weeks |
| Second Storey Addition | $150k–$300k | 6–8 weeks |
| Laneway Suite | $120k–$250k | 8–12 weeks |
| Whole Home Renovation | $200k–$400k | 10–14 weeks |
These figures show how scope drives both budget and schedule.
For a cross-country perspective, California homeowners in 2025 face USD 45,000–100,000 for a full kitchen remodel and USD 6,000–15,000 for a modest bathroom update. Sacramento’s whole-home projects often land between USD 200,000–400,000. Learn more about 2025 California renovation costs
If you need more local numbers, check out our detailed guide on home addition costs.
Contingency And Value Engineering Tips
I always reserve a 10–15% contingency to handle surprise fixes or delivery hiccups. Value engineering isn’t about cutting corners—it’s about swapping in cost-effective materials or simplifying design details for smart savings.
- Lock in trade rates early once plans are set
- Negotiate bulk discounts on materials and labour
- Spot complex details in drawings that you can simplify
- Pre-book inspections so you’re not left waiting
These tactics keep your budget on track and your timeline firm.
Trade Availability And Scheduling
Toronto’s top carpenters, electricians and plumbers often have month-long waitlists. In peak season, an electrician might be 6–10 weeks out, while painters and finish carpenters typically start in 2–4 weeks.
- Book key trades in quieter months to cut lead times
- Use friends or family for simple prep work to free up specialists
- Use a scheduling tool to visualise overlapping tasks and milestones
A clear trade calendar can shave weeks off your project and keep momentum strong.
“Always add weather buffers to keep your schedule intact.”
Weather Impact On Timelines
Toronto weather loves to surprise. Snow squalls can pause exterior framing, rain can stall roofing, and cold snaps can slow concrete curing by 7–10 days.
- Build seasonal buffers around foundations and exterior work
- Consider tenting or temporary heating for cold-weather concrete pours
- Opt for moisture-resistant products to avoid delays from damp conditions
With proactive weather planning, you’ll dodge most timeline extensions and preserve build quality.
These cost brackets and timing triggers give you confidence to plan your Toronto renovation or addition from day one.
Common Pitfalls And How To Avoid Them
It’s all too easy for a renovation to derail when something hidden pops up—and suddenly, costs spin out of control. Small, unchecked changes—known as scope creep—can slip in and inflate your budget before you know it.
At the same time, a contract that skips material specs, warranty periods or payment schedules can leave you scrambling mid-build.
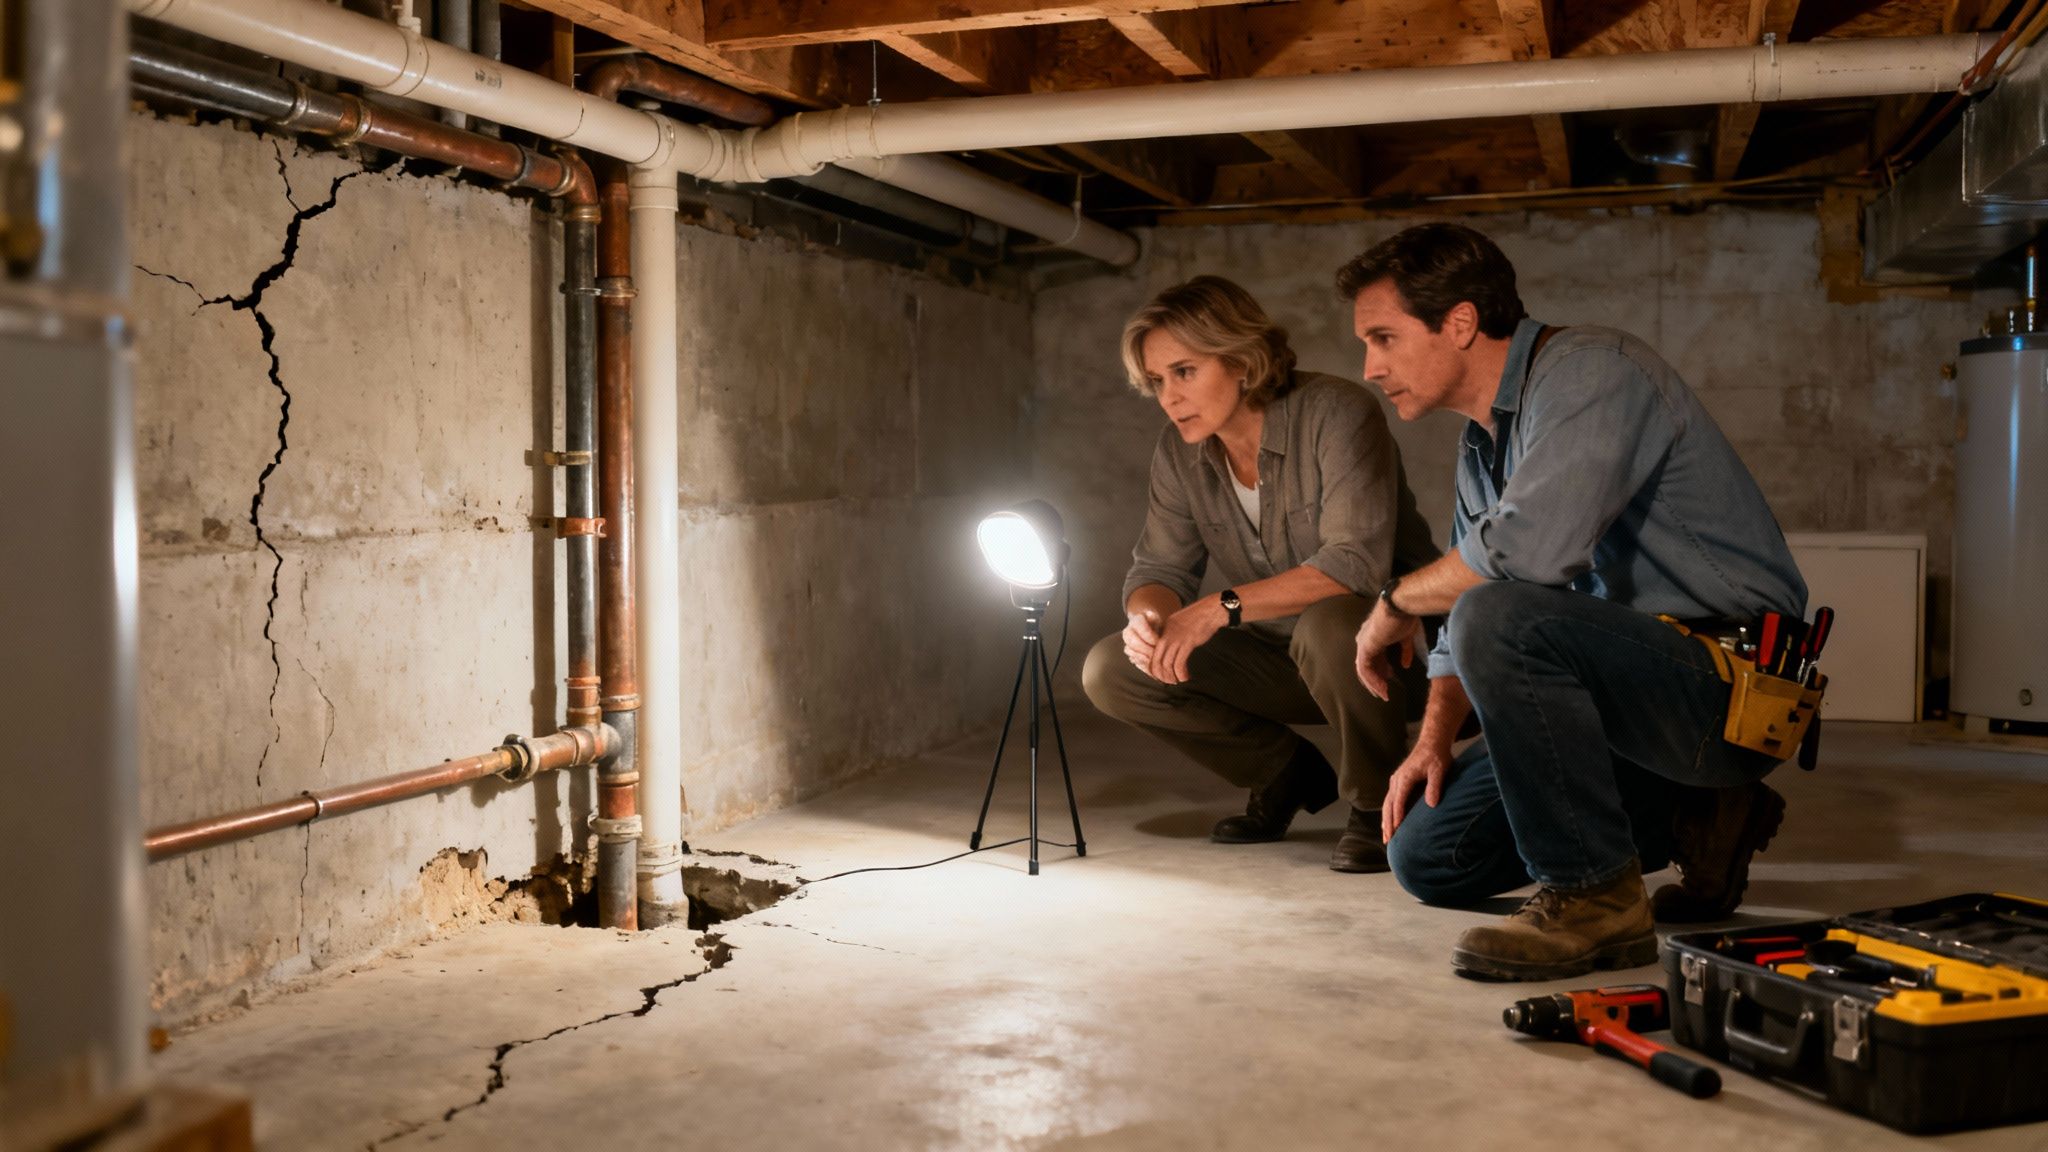
Recognizing Structural Surprises
In Toronto’s oldest neighbourhoods, rotten joists or corroded pipes often hide behind walls. On one Cabbagetown project, workers exposed cast-iron plumbing so damaged it needed a full reroute. That discovery tacked on an extra 12% to the budget and paused work for days.
“Skipping a full site survey is like driving blind on a construction site,” warns a local contractor.
Prevention Tactics
- Draft a thorough scope of work that details deliverables and formal change-order steps
- Break permit approvals into phases, so compliance gaps surface early
- Hold weekly check-ins with your design-build crew
- Allocate a 10–15% contingency in your budget for surprise repairs
Putting every decision in writing keeps everyone aligned. To put these tips into action:
- Read every contract clause—focus on deliverables, timelines and contingencies
- Commission a detailed site survey covering structure and MEP systems
- Track permit milestones and submit updates without delay
- Monitor costs continuously and flag any overages above 5% immediately
Communication Best Practices
Regular updates will head off misunderstandings before they turn into wasted time. In one Leslieville kitchen renovation, work stalled for 3 days because an electrical tweak never made it into the logbook.
“Clear, documented progress notes are your best tool against surprises,” says a Toronto design-builder.
| Common Pitfall | Prevention Method |
|---|---|
| Scope Creep | Detailed scope and formal change orders |
| Hidden Structural Issues | Comprehensive site surveys |
| Unclear Contracts | Legal review of payment and material terms |
| Stakeholder Misalignment | Weekly project check-ins |
Following these checks keeps your renovation moving steadily forward.
Case Study Toronto Structural Surprise
On a High Park makeover, crews found mould behind plaster walls. That hiccup shut down work for 5 days and added $3,200 to the bill. It’s a prime example of why a moisture assessment should happen before you pull down any drywall.
- Run moisture and pest inspections before finalising scope
- Use infrared scans to spot what you can’t see with the naked eye
- Include specialist fees in your initial budget outline
- Walk through every room just before demolition to document conditions
This approach cuts the risk of last-minute stoppages and keeps your schedule on track.
Quick Checklist
- Draft a clear scope before any work begins
- Book site surveys early to uncover hidden issues
- Allocate at least 15% contingency for surprises
- Hold stakeholder meetings each week to align goals
- Confirm permit deadlines with your contractor
Dodging these common snags ensures your addition or renovation stays on track—both in timeline and budget. Keep every change on record and stay in close touch with your team to maintain peace of mind.
Maximizing ROI And Next Steps
Renovations can turn your house into an appreciating asset. Think of each upgrade like part of a garden: perennial landscaping represents improvements that continually pay dividends, while annual blooms offer quick bursts of value that fade faster.
In Toronto, perennials include energy-efficient windows, modern kitchen layouts and accessory dwelling units. These features often deliver a stronger resale story than cosmetic fixes.
Still, many homeowners find that meaningful investments—like kitchen overhauls—feel more rewarding than simply repainting walls.
Prioritizing Long Lasting Upgrades
A prioritization matrix can be your renovation compass. One axis tracks investment size, the other measures projected ROI. The top-right quadrant spots your renovation perennials: moderate spend, maximum value.
The bottom-right quadrant represents your annual blooms—low cost, modest returns and perfect for quick makeovers. Plot your projects on this grid before signing any contracts.
A visual matrix turns budgeting guesswork into clear direction.
Proven ROI Examples
Data from real projects highlights smart choices. A minor kitchen remodel generally costs about $26,790 and delivers a 96.1% ROI, recouping roughly $25,760. That’s a high-impact move without gutting the whole space.
For more insights, check out this Southern California ROI research.
Closer to home, upgraded windows in Toronto can return up to 80% of your cost. And a well-designed ADU addition will recoup around 60% at resale.
Top ROI Renovation Projects
-
Energy Efficient Windows
Improve thermal performance and curb appeal—recoup up to 80% of costs. -
Minor Kitchen Remodels
Swap appliances, update countertops and cabinetry for nearly 96% ROI. -
Bathroom Updates
Add walk-in showers, layered lighting and storage solutions for about 70% return.
Use this shortlist to populate your matrix with real-world numbers.
Decision Tools And Checklist
Renovations involve many moving parts. These templates help keep everything on track:
- Cost Tracking Template
Log bids, invoices and actual spend with dates and categories. - Permit Monitoring Tracker
Record submission dates, fees, approval status and reminders. - Contractor Evaluation Form
Rate pros on experience, communication, price and references.
Print and customise each form to fit your project goals. Then:
- Use the matrix to identify your top three upgrades.
- Reserve at least 15% contingency for surprises.
Tracking costs and permits step by step ensures nothing slips through the cracks. And when comparing contractors, balance price proposals with solid references—note insurance coverage, warranty terms and cleanup protocols on your evaluation form.
Consistent tracking makes complex renovations feel manageable.
Next Steps For Toronto Homeowners
- Sketch your high-priority projects and plot them on the matrix.
- Book a consultation with a design-build team versed in Toronto’s zoning, heritage and permit rules.
- Print your cost and permit tracking sheets before filing any applications.
- Compare contractor bids side by side using your evaluation form.
- Lock key milestones on your calendar with automatic reminders for inspections and payments.
- Celebrate each completed phase—and get ready to enjoy a more liveable home and sharper resale value.
Get started today.
FAQ
We’ve gathered the top questions Toronto homeowners ask when planning a renovation or addition.
Permit Requirements
Permit obligations vary by neighbourhood, but you'll generally need:
- Zoning clearance
- Building permit
- Heritage approval (for protected properties)
Find all forms, zoning maps and application guides on the City of Toronto’s official site.
“A clear permit application cuts weeks off your timeline,” says a Toronto planner.
Project Timelines
A second-storey addition typically takes 4–6 months from submission to final inspection. Allow an extra 2–4 weeks if weather or site access complicates things.
Budget and Financing
Most homeowners cover renovations with home equity lines of credit or renovation loans. Qualified applicants often secure rates around 3.5% from major banks and credit unions.
- City of Toronto ADU guide links
- Typical project durations and fees
- Financing options and tip sheets
How To Choose Your Design Build Team
When evaluating design-build firms, look for:
- A single-point contact to simplify communication
- Transparent pricing with a clear cost breakdown
- Proven expertise in the Ontario Building Code
- Local portfolios and honest client references
Interview at least two teams and compare their process, portfolio and pricing side by side. A simple decision matrix can turn a tough choice into a confident one.
For a free consultation on your addition or renovation, contact Castlegrove Construction
Article created using Outrank